Understanding Compressors
By John Dines – OE Product Manager
As you’re reading this article, you’ll hopefully already know a little bit about the company. Specifically how we started out in 2012 with the Cali76 compressor pedal – a guitarist-friendly unit that emulated all that’s great about the UREI 1176 studio compressor, in a larger-than-average stompbox. A lot has changed since then. For a start, the pedals are a lot smaller now and there are more of them (visit origineffects.com for details) but at least two things remain the same:
- Compression is awesome! It’s just about the best thing you can do to your guitar signal – or any audio, for that matter.
- Many guitarists underestimate the importance of compression or misunderstand what it’s doing and how to use it.
As compression nerds, we’re rather baffled at how this must-have effect flies under the collective radar of the guitar community. It’s been on almost all our favourite recorded guitar tones, perhaps not in the form of a compressor pedal, but used at some point in the signal chain between performance and mixdown. Good compression can add punch, liveliness, warmth and help your guitar sit just right in the mix, so why aren’t guitarists more excited about this cornerstone effect?
A lot of it comes down to understanding. There’s a learning curve to compression and we six-stringers can be an impatient bunch when it comes to manuals, science and theory. So, in the name of making everyone sound better, I’m going to walk you through the basics of compression, demystifying all the controls you’ve probably seen but maybe couldn’t get the most out of. I’ll try to make it as painless as possible…
Put very simply, compression makes the quiet parts louder and the loud parts quieter. More accurately, it turns down the loudest parts of your signal, reducing its dynamic range overall. This might not sound that appealing at first, but stick with me as there’s a lot more to it.
First let’s talk about threshold. The threshold is a chosen signal level above which compression is applied. As soon as your signal level exceeds the threshold level, compression is applied to all the bits of your signal that have crossed the threshold. That is to say, these loudest parts of your signal are turned down. The quieter bits, of course, remain unaffected.

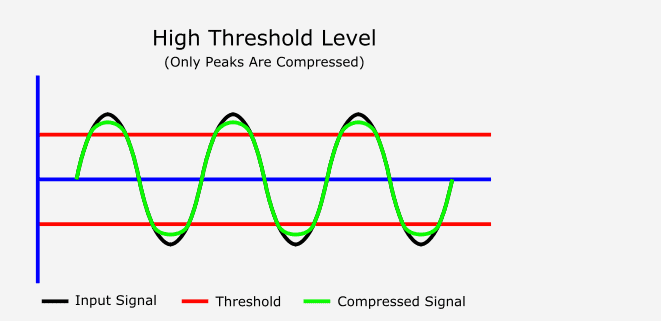
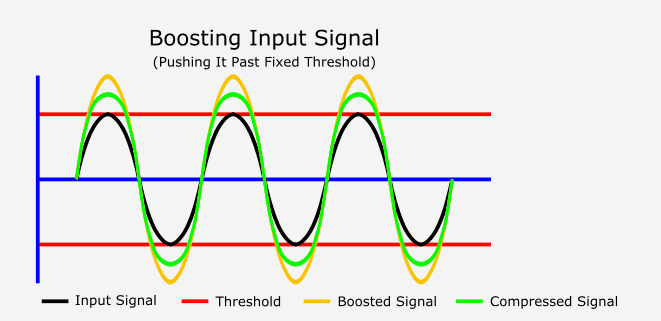
The lower the threshold, the more of your signal will be compressed. High threshold settings will mean that just the very peaks of your signal are subject to compression and the rest remains untouched. Many compressors have a Threshold knob but, in older compressors like the UREI 1176 that our Cali76 compressors are based on, the threshold is fixed. You simply control it by feeding more signal into the input, pushing more of it past the threshold and compressing a bigger portion of the signal the higher you go.

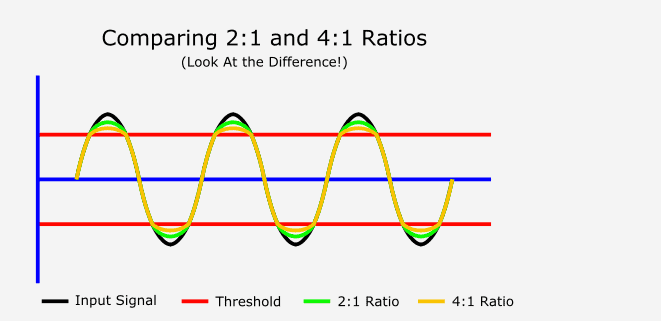
So, if the threshold controls how much of your signal gets compressed, then the Ratio controls how much compression is happening to that part of the signal. To put it another way, when those signal peaks are turned down, how much are they turned down by?
Let’s imagine we set a ratio of 2:1. This means that if we exceed the threshold by 2dB, this part of the signal will be turned down until it’s only 1dB above the threshold. A 4:1 Ratio would lower that same input signal down to 0.5dB. Considering that the ratio controls on compressors often go above 20:1, we can do some pretty dramatic things to our dynamics if we want to.
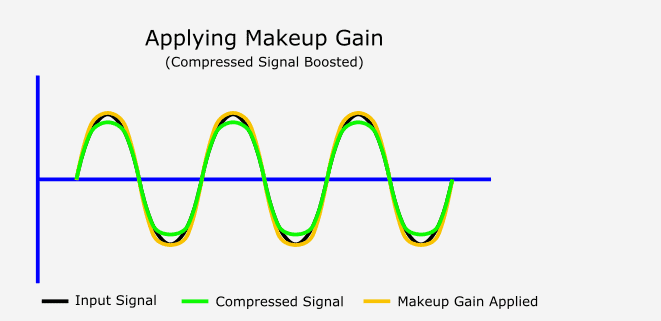
If you haven’t got bored already and decided to just go and play your guitar instead, you might now be thinking “all this turning down is just going to make my guitar quieter”. That’s why compressors have Makeup Gain, which is just adding volume at the output. With a bit of level added, we’ve now got a signal where the peaks are just as loud as they were before, but all the quiet bits are louder. This is where it starts to get good, as we can now hear all the interesting, quieter parts that would otherwise get lost in the mix, without the loud stuff jumping out and chopping your head off!
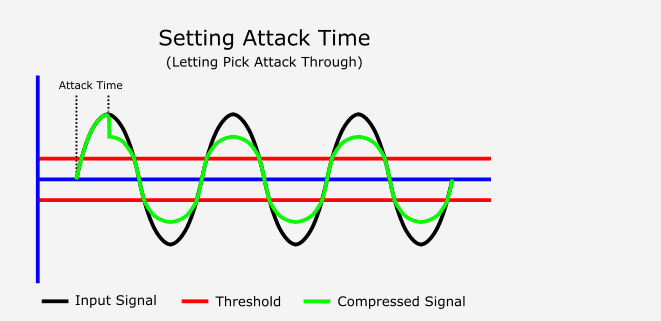
So far, we’ve helped your guitar sit better in a mix, but what about making it sound punchy? This is where the attack and release controls come in. Once our signal has crossed the threshold, the attack control determines how long it will be until the compressor starts acting. It’s usually only a matter of milliseconds but that’s enough to let some loud pick attack through at full volume, before the compressor clamps the level down.
The longer the attack time, the more open and lively the sound. Shorter attack times will catch all those peaks straight away and sound super squashed, which can also be very cool.
The Release control works on the same principle, controlling how long it takes before the compressor stops compressing. Short release times keep things percussive and bouncy, whereas longer release times will help increase sustain.
These controls tend to work best in opposites. Longer Attack and shorter release times for more natural dynamics, or short attack and longer release for very obviously compressed sounds.
These days, lots of compressors also allow you to blend in some uncompressed dry signal in parallel with the affected signal. All the compressors in the Origin Effects range let you do this and, while it’s a bit beyond the basics, this parallel compression is a really popular technique, especially in studio situations. It can help balance more extreme compression settings by adding back in some of the natural dynamics of the instrument and its certainly worth experimenting with.
Like with all this stuff, there are no rules – if it sounds right, it is right. Similarly, if it sounds wrong, it is wrong, and a better understanding of how compression works should help you get the tones you want, without getting stuck going round in circles. Now go and play guitar, class dismissed!